Strobing
Brake Light
|
An easy
way to draw maximum attention to your
derriere !
|
|
The auto industry learned years ago, the importance of
"heads up" braking indicator lights. As cars
vans and SUVs gain in size and ground clearance, drivers
are less focused on the usual low mounted lighting, and
you have to hit them in the face to get their attention.
The biking industry is beginning to acknowledge this
safety factor, but as of yet, is still a bit puzzled as
to how to go about it.
There are several innovative "systems" and
modules already on the market that enhance your current
rear lighting, or add to it, but few, if any of them
actually pay attention to the height factor. Simply
adding a blinking light to the tag bracket does not
significantly raise the line of sight to the attention
getting strobe, and its luminance is somewhat diminished
by the primary brake light itself. If you want to get
noticed, put the light in their face and point it
straight at them!
Some modulator systems use an intermittent steady and
blinking light to draw attention, but this can also give
misleading signals to the commuters behind you. Try
following one of these sometime, and you will see what I
mean. Its hard to tell if the rider is braking on and
off, or steady holding and this can be important
information to a follower.
I have had countless comments on my own version of the
attention getting brake light, which is a very simple mix
of inexpensive components, and a little thought process.
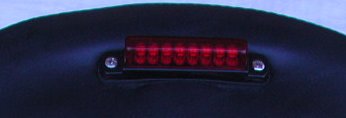
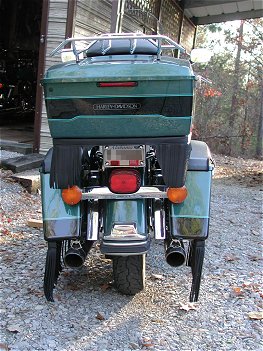
A simple LED strip of 3" to 6", mounted high on
the bike, either on a tour pack or backrest, wired
through a simple automotive flasher relay, to the brake
light wire under the seat, puts a "no mistake about
it" fast strobing brake right in the eyes of the guy
behind you!
 |
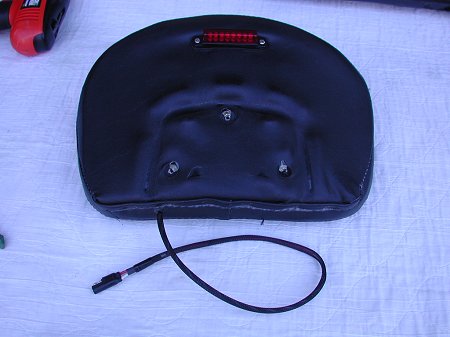
By mounting the light strip onto a backrest, you put
it right in the line of sight to the driver behind you.
Mounting to a backrest pad is as simple as drilling three
small holes in the back (two for mounting screws and one
for wiring), then fishing the wiring through the foam
padding and out the bottom of the cover. You can then
hide the wiring from the pad by fastening it along the
inside surface of your sissy bar.
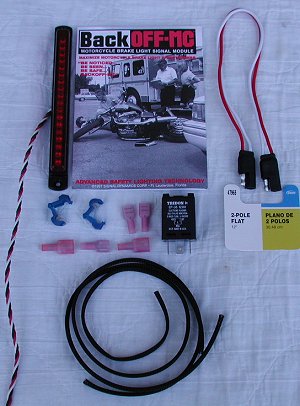
You can get 3" or 6" LED strips in either
chrome base or black base, from Signal
Dynamics for around $40, and you can buy a "smart"
turn signal flasher from any auto discount store for
under $10 (the kind that flashes rapidly if one light is
out). By wiring the LED strip through the flasher to the
brake light wire, the flasher will think that a light is
out, and will rapid flash your LED when the brakes are
applied.
Now let's add a level of surprise to the already VERY
noticeable strobe light. Signal Dynamics strips come
wired for tail and brake lights. DO NOT WIRE THE TAIL
LIGHT. For best results, you want the strobe to
remain in "stealth" mode until the brakes are
applied, for maximum attention. Secondly, using a strip
with a BLACK base will further enhance the "stealth"
mode.
Signal
Dymamics (Back Off) light strips are available at
many bike shops, or you can buy them direct from
the company at www.signaldynamics.com
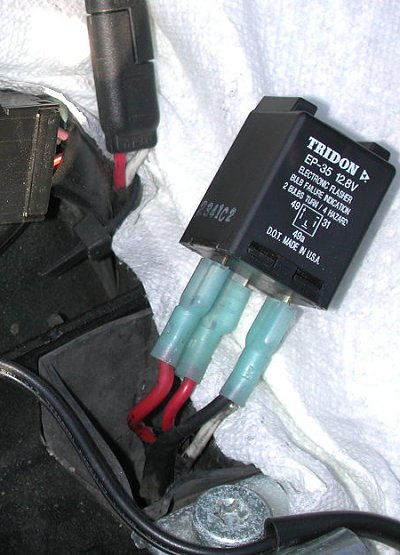
Pick up a Tridon EP-35 signal flasher relay from
your local auto store, and while you're there,
grab a pack of "T"-Taps (clip on wire
tapping bases with matching spade connectors)
I soldered on some light gauge wire to extend the
LED wiring for fitment to my bike, protected the
joints with heat shrink strips, then covered the
entire length of wiring from the pad to the ends
with black woven wire sleeving, then crimped on
the spade connectors, leaving the white TAIL
light wire un-ended, as it would not be used.
For easy removal of the backrest or Tour pak, I
recommend the use of a two prong flat connector
so that the wiring can easily be unplugged.
|
|
By
mounting the light strip onto a backrest or high
on a Tour Pak, you put it right in the line of
sight to the driver behind you. Mounting to a
backrest pad is as simple as drilling three small
holes in the back (two for mounting screws and
one for wiring), then fishing the wiring through
the foam padding and out the bottom of the cover.
You can then hide the exposed wiring by fastening
it along the inside surface of your sissy bar
with either adhesive wire clips or small wire
ties.
(Road King Passenger Backrest
Shown)
|
|
TIP:
When drilling the center hole for the
wiring, drill it at a sharp downward angle toward
the bottom of the pad. This will make fishing the
wire much easier.
|
|
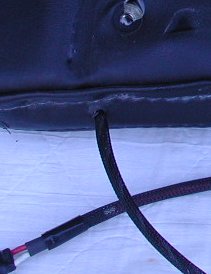
Punch,
drill, or cut a small hole in the lower part of
the pad cover near the inside edge of the sissy
bar, for the wiring to pass through.
|
|
| Locate the
brake light wire under the seat, and crimp on a
"T"-tap, then locate a ground wire and
do the same. Now wire from the two "T"-taps
to where ever you decide to locate the flasher,
and add female spades to the flasher ends. |
|
| The Flasher is
marked for "+", "-" and
"L" (signal wires). The "+"
post is connected to your bike's brake light
wire, "-" to the bike's ground wire,
and the signal connector is for the red wire from
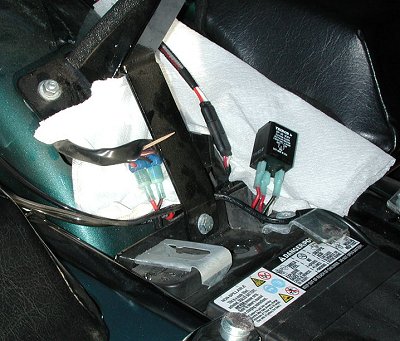
your LED strip. On Touring Harleys, there is a
rubber well behind the battery that is a perfect
fit for the flasher. (photo from a Road King)
By doubling up on the ground connection, you
can provide an easy ground for the LED strip. (Black
and White wires in photo)
|
|
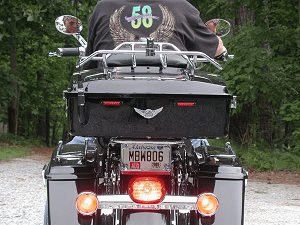
| 3"
LED Strip Mounted to Corbin Gunfighter |
6"
LED Strip mounted to King Tour Pak |

|
|
|
|
|