2002 FLHR-I ~ With Cruise Control
Plugs viewed from BACK (wiring) side
Handlebar Replacement
| For Road King Models |
One of the most often found early changes to Road Kings is replacement of stock handlebars. Many people find the stockers to be an uncomfortable forward reach on longer trips, and opt for higher rise or greater pull than the stockers offer. There are many styles and manufacturers to choose from, and prices vary from less than $50 to what ever you're willing to pay. Hopefully this page will be of assistance to the newcomer or old timer that wants to save a couple of hours of shop labor costs and do the replacement at home.
Handlebar adjustment or replacement is not difficult, just a bit time consuming.
| Getting to the Riser Clamps |
-Pull the
windshield.
-Unscrew the bottom screw at the headlight trim ring and pull up
to release the ring.
-Unscrew all the rubber mounted phillips screws that hold the
headlight in place against the nacelle. (A cordless screwdriver
in reverse works extremely well here, but don't tighten them that
way)
-With a 5/16 wrench, unscrew the nut
holding the front of the chrome spear trim from inside the
nacelle.
NOTE: Upon
re-assembly, DO NOT over tighten the nut or you will break off the stub.
this is just a twist nut, not to be put under a lot of tension.. Lift the spear free (its hooked into the riser cover)
-With the same wrench, hold the nut from inside the nacelle that
secures the front of the riser cover, and unscrew the phillips
screw. (careful or you will drop the nut and have to go looking
for it)
NOTE:
Upon re-assembly, the tiny nut and washer are hard to reach to
get the screw started. Use masking tape, and tape across a box
end wrench, then drop in the nut, and lay on the fender washer.
Be sure the masking tape is long enough to contact the washer as
well, so everything stays in place. The screw will penetrate the
masking tape as you tighten it.
-Pop off the Fork Lock cover ring by lightly prying up on it, and
remove the two phillips screws that secure the riser cover to the
fork lock area.
Now the cover is free, and you can access the riser caps. (If you are only repositioning the bars, this is as far as you need to go).
| Disconnecting the Wiring |
The connectors to
the handlebar wiring are clipped into place on the front side of
the triple tree. To make the whole job much easier from this
point, go ahead and remove the nacelle. Very easy to do....
-Remove the four acorn nuts that secure the windshield plastic
washers, clutch cable, and light bar onto the sides of the
nacelle.
-Lift the light bar forward and off the posts, and lay it gently
onto a heavy towel or blanket over the front fender.
-Slide the plastic washers off and the nacelle will separate and
slide off both sides.
-Unplug the wiring to the nacelle rear toggle switches as you
remove the nacelle halves.
Removing the nacelle makes it much easier to work with the wiring
connectors.
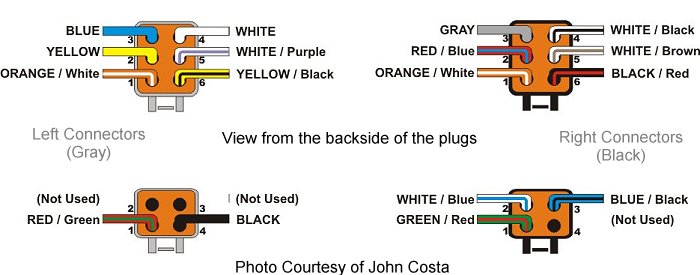
If you are replacing your bars with bars drilled for internal
wiring, draw yourself a diagram of how the wiring is setup in the
connectors, as you will have to remove the wires from the
connectors, then re-seat them after the bars are wired. To get
started, print the diagram below and make any necessary changes
if your bike is setup differently than mine.
| Road King Handlebar Wiring Plug Diagrams 2002 FLHR-I ~ With Cruise Control Plugs viewed from BACK (wiring) side |
|
|
| Connector Disassembly |
After drawing a
good diagram for re-assembly, pop off the red cap on the end of
the connector with a flat blade screwdriver. (its a snap fit).
-With a pointed electrical tester or similar pricking tool,
carefully lift the rubber plug from the rear of the connector and
work it up the wiring a little bit.
-With a very small screwdriver or other small narrow flat picking
tool, reach inside the outer end of the connector and pry the
barbs toward the center area as you pull each individual wire
from the back.
| Control Units |
When removing the controls from the bars, remember to wedge a small piece of cardboard or leather into the brake lever stop so that it won't be at full rest position upon re-installation (this helps to avoid damage to the brake light switch probe).
After removing the brake reservoir, completely loosening both throttle cables, and opening the throttle control housing, you will see how the throttle cables wrap around the throttle grip, and are held in place by a pair of brass ferules. Carefully lift the rear cable up from its track on the throttle grip, enough to slide the ferule out to the left (there is a slot there for the cable to pass through). Once the ferule is clear of the grip, it will easily fall off the cable, so slip it off and set it aside. Now rotate the throttle grip fully, to expose the front cable, and repeat the procedure. The rear cable should always come off first, and go on last. Its a bit of a tight fit, and sometimes a pair of needle nose pliers can come in handy, but ONLY use them on the rear cable. The front cable should never be handled with tools, or stressed in any way. This will help avoid a popped cable out on the road somewhere.
If your bike is not equipped with cruise control, you will have a small friction plate in the bottom of the control housing, which just sits on a small locating pin. This plate will fall out, so be careful not to lose it, and upon re-assembly, make sure that the plate is properly centered on its pin or it will bind your throttle.
The throttle cables simply pull straight out of the control unit, once the grip is removed. There is a tiny compression spring that holds them in and you just wiggle and pull HARD until they snap out. A small drop of oil around the inside lip of the hole will help. Remove the grip, put a drop of oil around both cable housings from the inside, then tighten the control back onto the handlebar so you can have something sturdy to pull against.
If you're saving your old grips, see my grip removal page for tips on grip removal.
| Throttle Cable Adjustment |
1.) Remove the air breather so you
can see the throttle wheel on the carb/EFI.
2.) Open the throttle grip wide open, and adjust the throttle cable
(front one at the grip) so that the carb/EFI wheel just touches its full stop
plate. Adjustment is achieved by sliding back the black rubber boots at the hand
control end and loosening the locking nut, then turning the hex sleeve to
stretch or shrink the cable.
3.) Close the throttle grip, and adjust the decel cable until you have
only a small amount of slack.
4.) While working the grip, make sure that the carb/EFI
wheel meets both of its stops while the throttle is fully open and fully closed.
Do this with the forks fully turned both ways as well to be sure there is no
cable binding or pulling.
After Adjusting the Throttle Cables, it will be necessary to reset the Cable
Lash Initialization for the Cruise Control.
| Cruise Control Cable Lash Initialization |
If you're bike is equipped with electronic cruise control, you should reset the Cable Lash each time you disturb the throttle cable adjustments. Although not complicated at all, it is difficult for us old dogs to remember the sequence, so here is a printable link to help you. Cable Lash Initialization.
| Extended Wiring |
Depending on the combined height, width and pull of your new bars, you may be required to extend your handlebar wiring harnesses. There are extended wire "kits" available for some models, but it you take your time and pay attention, it is not difficult to extend your own.
1.) Lay the wiring
out on big table, cut the sleeving loose at about 4" out
from the control, and slide the sleeving off the wiring.
2.) Cut as many pieces of 18 gauge wiring as you need off
a roll and strip a half inch off each end. (17 pieces for an '02 FLHRI with
cruise) at what ever length you want to extend the harness (I cut
mine 10 inches) NOTE: The left control uses three
wires that are 16 ga. You may want to add 16 ga wire to your setup just to keep
the sizing correct, but the rest can be done with 18 ga. to minimize bulk.
3.) Cut two pieces of heat shrink tubing for each wire
that you just cut, and slip both pieces on the splice and slide
them to the middle of each one, then lay all that over to the
side in a pile.
4.) Pick a wire, any wire, and cut it approx one inch away
from the remaining end of the sleeving, and strip both ends one
half inch.
5.) Lightly twist the end of the wire you just cut to one
end of one of your splice wires, and solder the connection, then
do the same for the other half of the cut wire and the other end
of the splice wire.
6.) Now, move down approx one inch on the next wire and
cut it, then follow step 5 above. Staggering the joints is
done to prevent a large bulge of joints in one spot.
7.) When all soldering is done, light a candle and slide
the heat shrink covers over each joint, and lightly heat to
shrink.
8.) If your wiring is going inside the bars, just lightly
spiral wrap the exposed wiring with electrical tape for a bit,
and finish up with the old sleeving down at the connectors. The
sleeving should be over the area of wiring that exits the
handlebars for greater protection.
9.) Install the extended harness into the bars and re-install
the connectors. :-)
For some reference points, I have saved a Handlebar Specification Sheet from the Harley Catalog, and added a few aftermarket favorites at the bottom.
The Road King is a fabulously flexible touring cruiser. Tweaking it into a perfect fit is half the fun of owning one!
|