"Skinning"
the LC Intruder
|
Removing
the Speedometer console, and air box
covers for maintenance access.
|
|
Looking for your spark plugs? Time to clean the air
filter? Can't find the main fuse? One of the things that
generates income for a bike shop is hourly rates in the
service department, so naturally, they like to design
bikes to be "intimidating" to the consumer from
a technical viewpoint.
However, with a few basic tools and some patience, you
will soon learn that "shop time" is usually
nothing more than nuts and bolts and patience. Suzuki
does a very fine job of hiding the maintenance components
from the spectating public, and your LC is no harder to
service than the run of the mill sport bike or Gold Wing
with all their plastic "skins".
If you should need to gain access to the components
behind or beneath the console or "skins" (that
'fake tank' looking stuff), give yourself time to read
this page, and 10 extra minutes in the shop, and you're
there!
Your Suzuki tool kit contains all
of the necessary tools to perform this task:
4, 5, and 6mm hex (allen) wrenches, 8 and 10mm
open or combination wrenches,
pliers, Phillips screwdriver, and optional spark
plug wrench.
|
1. Remove the driver's
seat: Remove the two allen head screws from beneath the
lower rear of the seat, and the two 10mm bolts from the
lower front of the seat (the one on the left holds the
choke control on), and carefully lift the seat off.
2. Open the gas door lid and remove the
gas cap. Place a rag or something in the gas inlet to
prevent dropping anything in there while you work. DO
IT!!!
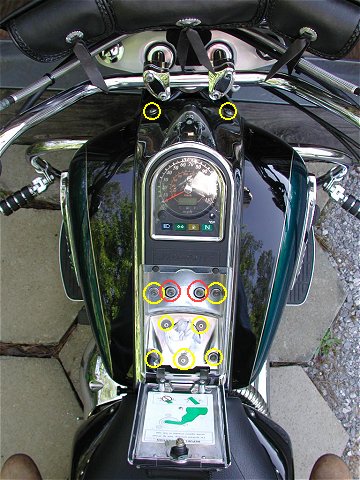
3. From within the gas door area, remove
the two allen bolts from the lower corners, the three
phillips screws (and washers and o-rings) from around the
gas filler neck, and the two allen bolts (and washers and
rubber washers and metal sleeve spacers) from the upper
corners. (the two allen bolts in the upper middle, circled in red, hold the side
covers on, and do not need to be removed at this time on
some models, as the console is cut around them).
Be
careful to note the configuration of all screws
and their corresponding rubber rings and metal
sleeves!
It helps to have a board or table to lay each set
out in sequence as you remove them, for ease of
re-assembly.
Here's a cool tip from a fellow LC Rider
Joe Allen: I snapped a full frame pic of the
top of the tank with the hatch open on my camera phone and
printed it out on 8.5 x11 and taped it to an assembled FedEx box
(you can pick them up for free at a fedex office).
I cut a small "X" incision through the photo and box at each
bolt - like a straw hole in a soft drink cup - and as I removed
each bolt and screw I pushed them into the corresponding hole.
This kept them from getting lost, made sure I remembered where
everything went, and also kept associated washers and spacers
attached. I find the box works better than a piece of cardboard
as it provides enough resistance that you can easily push the
bolts in with one hand, and setting it down won't accidentally
push the bolts back out. You can also keep the box in your shop
somewhere for the next time you need to tear into the bike!
|
4. Remove the two small
button head allen screws from the forward surface of the
console (up near the neck).
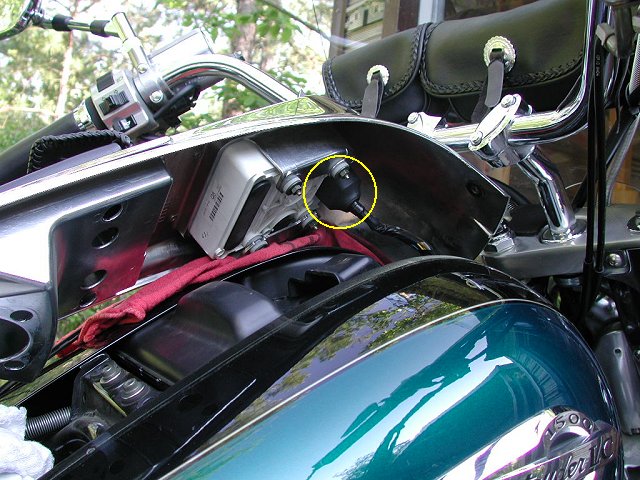
5. Gently lift the console up, and reach
underneath the speedo area and feel for the connecting
plug. The connecting plug has a molded in retaining clip
at its front. After pulling down the rubber dust cover,
squeeze in on the clip, and wriggle the plug down and out
of the receptacle.
(Placing
a shop rag under the console edge will make your
paint last much longer!!)
|

Click the photo for larger image |
(Feel for the
retaining clip at the front of the plug) |
It is not necessary to go any further
with skin removal, if you only want to check, clean or
replace the air filter. Remove the three screws holding
the triangular air filter lid on, and lift it up, and
remove the filter. The air filter works in reverse of
most automotive filters, in that the air is drawn from
the center outward. To clean it, just blow compressed air
into the outer surface, forcing the dirt to fall from the
center. Reach into the airbox with a clean rag and wipe
out any oil vapor residue from the walls of the box, and
re-assemble.
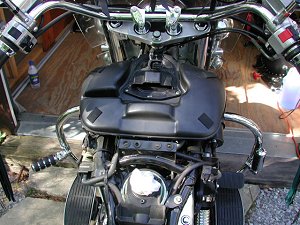
To remove the side covers ("Skins"),
remove the two remaining allen screws from the cross
member which were visible while the console was in place.
(you can see those two screws in the lower left corner of
the photo above.), then remove the button head screws
that hold the neck covers on in front of the skins. Slip
the neck covers down and away from the frame, then slide
the skins straight off to the side.
 |
 |
| Click
the photos for larger images |
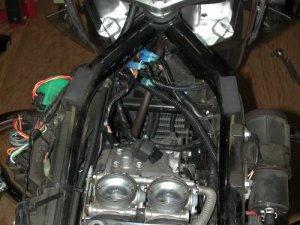
To remove the airbox, use a long phillips
screwdriver to loosen the two carburetor/air intake
bands, lift the airbox up, then feel for the pair
valve inlet tube coming from the bottom right
side of the airbox, pinch the retaining clip on the tube
and slide it down a bit, then pull the tube free from the
bottom of the airbox, now feel for the crankcase
vent tube at the front of the airbox. Pinch the
retaining clip on the tube and slide it down a bit, then
pull the tube free from the front of the airbox.
Anytime the airbox is removed from the bike,
you should remove the air filter and wipe out the
interior of the box, and remove the vinyl drain nipple
from the left side bottom and clean the oil from it, then
clean the air filter by blowing it off, then put it all
back together again.
If you're headed for the spark plugs,
remove the crome head cover from the RIGHT side
of the front cylinder and the LEFT side
of the rear cylinder, and be careful not to lose
the two little rubber bumpers under each one! Use the
Suzuki supplied spark plug wrench to remove the plugs, as
there is very limited space around the plugs, and the
Suzy wrench is made to accomodate that.
OK, I helped you get it apart...now YOU
gotta figure out how to get it back together again!! HAHA!!
(hint...read backwards) 
|