Modifying an "Undertaker"
style Carrier
|
For use with Vectrix and
other small wheel bikes.
|
|
I recently purchased a bike carrier similar in design to the
Undertaker style (Front Wheel) carrier, however, these tow bar mounted
"full size bike" towing units will not support the smaller (13") front
wheels of the Vectrix and other small wheeled scooters and cycles. So a
couple of hours in the shop with some scrap materials and a bit of
hardware were instantly in order as I would rather make the unit work
than to give up and send it back.
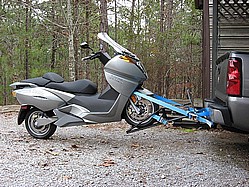
The unique advantage of the "Undertaker" type towing system is that
it (normally) requires no ramp, and no physical lifting of the bike's
front end to get the front wheel into the tow rack. This type system
employs a screw jack design so that the bike can be secured at ground
level, then raised for towing.
All images on this page are linked to 800x600 large resolution photos
for better viewing. Just click on the image.
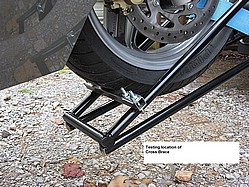
Since the smaller Vectrix wheel falls through the
tubular cage of the carrier, it is necessary to create a shorter
tire slot, by installing a cross member to the framework
Trial and error placement for my Vectrix 13" front
wheel determined that I needed to reduce the wheel cage frame by
3.5" to adequately support the Vectrix and keep the brake rotor
from contacting the tubular framework.
|
 |
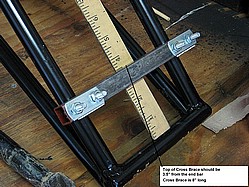
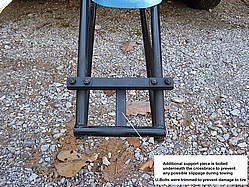
The 8" cross
member was cut from a length of 1" square steel tubing, and
secured to the tubular carrier frame by a pair of 1' x 2.5"
U-bolts, all purchased from my local hardware store for around
$10
The top edge of the cross member is placed 3.5"
from the top edge of the original cross bar at the bottom of the
carrier.
|
 |
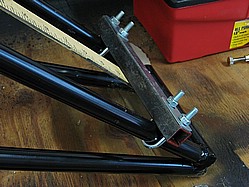 |
To
eliminate any possibility of cross member position slippage
during towing, I cut another section of the square tubing and
bolted it underneath the cross member. Its bottom end has been
ground to a curve, so that it saddles over the bottom cross bar
(it is not attached there).
In this photo, you can see that the excess
U-Bolt threads have been cut off and ground smooth to prevent
any damage to the tire during loading.
|
|
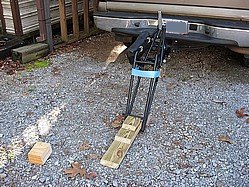
Placing the
cross member at the bottom end of the carrier creates the need
of a small ramp for loading, due to the resultant 4" loading
height.
It would have been less complicated to position
the cross member at the TOP of the carrier, rather than the
bottom, to eliminate the need for the ramp and sidestand block,
but the location of the wheel strap and ratchet would then not
be in a proper alignment, and would not properly support or
secure the wheel.
|
|
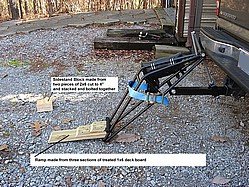
I made a small
ramp out of some leftover sections of 1x6 treated decking board,
and made a sidestand block out of a couple of 4" pieces of 2x6
stacked and screwed together.
Note: If your bike has power, it will not need
the ramp, but pushing a dead bike up into the carrier by hand is
much easier with a ramp.
|
|
| The built in bonus
to bottom placement is that should you screw up and not have the
bike cranked high enough to go over dips in the road, the bottom
bar will hit the pavement first, preventing damage to the tire,
and you will hear this from inside the vehicle!
|
 |
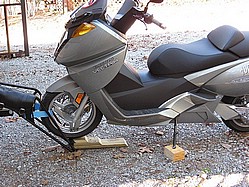
| The sidestand
block enables the use of the sidestand while the front wheel is
being secured and the bike is being strapped, making loading an
easy one-man job. |
 |
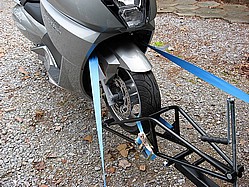
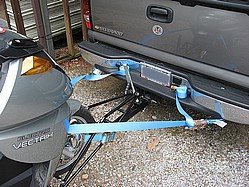
Once in place and with the wheel secured with the strap, use
the fork hooks under the fairing to lightly secure the
bike to the bumper or widely spaced eyebolts or tow hooks on the
vehicle, then crank the screw jack mechanism to raise the bike
and carrier off the ground.
The tie straps will tighten as the bike is lifted.
|
 |
 |
|
Before you tow the bike, make sure the
bike's forks are not compressed over half way. The movement of
the bike over humps and dips in the road will compress and relax
the forks a bit, so you have to leave enough slack in the fork
springs to accommodate this. |
| If you can see
the bike in your rear view mirror, you may notice that it wildly
leans to the outside of a curve. This is normal, and is due to
the angle of the neck.
|
| SAFETY LAST!!
As if I really needed to say this: Before unstrapping the
bike, lower the carrier to the ground, put the sidestand down
and slide the sidestand block under it! Standing on bike right,
and holding the right side handlebar, pull the bike slightly to
you, then release the rightside tie strap, and ease the bike
over onto the block supported sidestand. Then while holding the
leftside handlebar, release the leftside tie strap, and finally
while holding one of the brake levers, release the wheel strap,
then get both hands on the handlebars before moving the
sidestand block, releasing the brake and easing the bike off the
carrier (ramp not needed for unloading) |
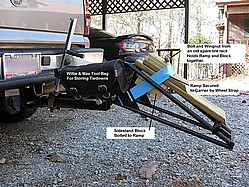
STORAGE MODE: To keep everything neat and in one spot, I
strapped a Willie & Max motorcycle tool bag to the frame to
carry the tie straps, and I used an old spare tire carrier bolt
and wingnut to bolt the sidestand block and ramp together, and
simply strap it onto the unit with the tire strap ratchet. If I
need to be towed, my wife doesn't have to go looking for all the
pieces!

|
 |
Click here for
information on purchasing an "Undertaker" Carrier system.
Click here to watch a "You Tube" video of the Undertaker in action.
|


