Decomps
for Dummies
|
The
SIMPLE way to optimum decomp starting
performance
|
|
For decades, the motorcycle industry has enjoyed the
monetary benefits of making bikes APPEAR to be more
complicated than the average shade tree mechanic can
manage. This helps maintain a generous flow of traffic to
the Service Department of your local dealer, where the
technicians know all the shortcuts and tricks of the
trade, to make life easy and the bosses happy.
Enter the dreaded Decompression adjustment procedure for
the LC Intruder!! Ever read the manual on how to adjust
these things? AARRGGHH!!! Visions of major oil spills,
parts strewn all over the property, and a basket case
engine that will never run again!! Quick! Load her up and
haul her to the shop for this one!!! NOT!!
The Factory Service Manual shows how to initially setup the Decomp
system on a brand new factory assembly. It never goes beyond that point
to explain how to actually tweak them for the individual bike, so once
you know how to get TO the adjustment points, put the manual away.
Decomps have a very simple job of reducing compression inside the
cylinder by slightly lifting the exhaust valves. When engines are so big
that they require more power to turn over than the starter and battery
are capable of, the use of decomp valves cams is preferable to beefing
up the electrical components. If your starter and battery are good, but
are having trouble spinning your engine over, there's too much
compression fighting against them. While this condition is often found
in the rear cylinder (because of the weak cable system of linking the
decomps together), it is possible to have either or both of the
cylinders causing the trouble, so adjustment is a two-step
procedure. First you make adjustments to the rear lobe to insure that
both lobes move at precisely the same time, then you adjust the WHOLE
SYSTEM by tightening or loosening the front lobe cable at the solenoid,
until the starter doesn't have to work so hard.
Because the ideal setting for decomps is achieved by sound,
and not something you can measure with a stick and take a picture of, I
could type for days and it wouldn't make any difference. It isn't rocket
science, just make sure they both move at the same time, then make sure
they both open up enough for the engine to spin without a lot of work.
It took me longer to type this than it does to actually fix your
decomps.
Realistically, diagnosing the problem behind a bike
that won't start, can be a frustrating experience, as
there are many potential problems that can create the
same symptoms. Here are a couple of guidelines to help
determine the root of a "labored" starting
problem, and by "labored", we mean that the
starter motor kicks in and attempts to turn the engine
over, but either can't get it over the "hump",
or does so with a lot more effort than usual.
If your battery is over two years old, and you CONSISTENTLY
have a labored start, then the first suspect will be the
battery.
If she starts cold with no problems, but CONSISTENTLY
has labored starting while hot, then the charging system
should be checked. A grounding rectifier can actually
discharge your battery while you ride. The battery can
somewhat recover while sitting, so it may well start the
bike while its cold, but then not be able to start it
after only a few miles of riding.
If everything on the bike seems to be in perfect order,
and you OCCASIONALLY have a labored
start, or no-start, for no apparent reason, and with no
perceived pattern, then very likely, the rear decomp cam
is loose or lagging behind. A good test for this is to place the bike in
second or third gear when it won't crank, and push it
backwards a few inches while in gear, then try again. If
it starts then, you definitely have a loose rear cam.
Pushing the bike backwards while in gear moves the rear
piston back off its compression stroke enough to give the
system a running start at it when you push the button.
This will only happen when the rear cylinder stops on its
compression stroke. Therefore, it seems impossible to
predict when it won't start. Might be cold, might be hot,
might only happen once today, but maybe three times
tomorrow...This occasional no-start is
the prime indicator that the problem lies with the rear
decomp cam. (If the front cam were out of adjustment, it
would NEVER start properly, as both cams would then be
off their specs.)
The rear cam is actuated via a cable from the front
cam. This cable makes an "S" turn along its
path and its metal sheath is lined with nylon, for a
smooth action. Unfortunately, due to the pressure on it
during actuation, it tends to cut its way into the inner
nylon lining, leaving it with ever increasing slack. Once
the slack occurs, the rear cam moves slightly behind the
action of the front cam and does not open up quite as
much. It only takes a tiny bit of slack in the cable to
render the starting system incapable of turning over the
rear cylinder.
Therefore, the REAR CAM CABLE is the weakest link in the
entire decompression system, and it is more than likely
the culprit behind your occasional no-starts.
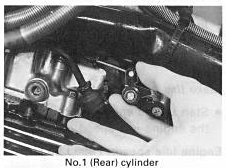
The decomp cams are located right
beside the spark plugs, so in order to make
adjustments, you will need to "skin"
the LC down for spark plug replacement (see
"Skinning the LC")
|

|

|
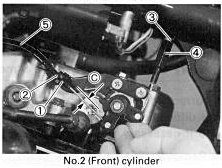
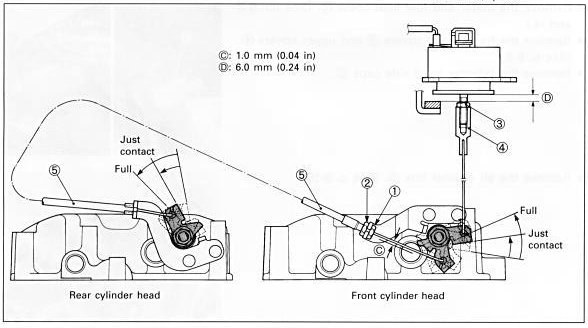
Adjustment of the rear cam is made at the right of the front
cylinder. On the right photo above, items 1 and 2 are the adjustment
nuts used to tighten or loosen the cable to the rear cam.
To tighten the rear cam you simply loosen the lock nut on
the front end of the cable bracket, then turn the
adjuster on the back end of the bracket counter clockwise
to back it away from the front cam, then secure the
adjustment with the lock nut on the front.
With the front cam resting on its stop plate, tighten the
rear cam adjustment until the rear cam lifts from its
stop plate, then loosen it back up until it just touches
the stop plate. Secure the front lock nut, and visually
check to ensure that the rear cam moves at precisely the
same time as the front one. Any slight delay in "lift
off" between the two cams means the rear valve is
not opening as much as the front valve. They should be
perfectly in sync.
Now, pull both spark plug wires from the plugs, and hit
the starter a few times to make sure all is well. If
starting is still "labored" a very slight
adjustment of the front cam may be in order, but this is
rarely ever needed.
Important note: The stop plates
for the cams are used only as a fixed reference for synchronizing the
two cams. You may need to loosen your front cam to get it to rest on the
stop temporarily, but final adjustment and distance from the stop plate
will depend on the wear factor on your bike. On a used bike, there is no
set amount of space or play, just whatever it takes to make the system
function properly.
Items 3 and 4 in the right photo above are used to
adjust the front cam. It is very unusual for the front
cam to get out of adjustment, due to the very short and
direct cable routing to it. If the solenoid is working,
it will not lose retraction depth, that cable will not
stretch, and there is no cable sheath to wear. High
mileage engines might be the exception here, as the cam
lobe can possibly eventually wear to some degree. If the
cable adjustment lock nut has not come loose, and no
major repair work (requiring removal of the solenoid) has
been done, the front cam is likely still set properly.
If you feel that the front
cam needs adjustment (which adjusts BOTH decomps at the same time), its easier to do trial and error
adjustment than to actually set it to specs. Adjust the
FRONT cable (that goes straight to the solenoid) by one half turn at a time, then hit the starter (plug
wires off but plugs still in) and listen. If the engine spins too easy,
as if there are no spark plugs in, the decomps are too tight. If it is
labored or won't turn over at all, they are
too loose! The trick is to find a happy medium so that the battery and
starter aren't working so hard to spin the motor. (after a couple of
revolutions, the decomps automatically disconnect to give the bike full
compression) This procedure beats the heck out of pulling
the generator cover and locating TDC, then trying to
measure free play in a difficult area to access.

|
The Decompression system is nothing more than a pair
of cheater cams that lift the exhaust valves slightly
during starting, to ease the burden on the starter and
battery. They are actuated by a single large electrical
solenoid that retracts the cams when you push the starter
button. The solenoid (upper right in the photo above) is
cabled to the front cam lever, and it in turn is cabled
to the rear cam lever. Pull the front cam and the back
one pulls with it.
The exhaust valves are only opened a very slight amount,
as too much retraction would leave insufficient
compression for the engine to run with, so there is a
very fine line between to much decomp and not enough. Too
much retraction and the engine will spin over like
somebody left the spark pugs out. Not enough retraction
and you will think you have a dead battery!
The trick to working with decomp adjustment is to make
sure that you really DON'T have a dead battery first!!

|


